This past week, a new feature was introduced with the 1.5.0 version of Hustle Castle: Gem Bay.
Gem Bay is a new venue for PvP battles that allow you to win a few new items that open up new gameplay features:
- Gems – Used to enhance fighter equipment
- Dust – Used to enhance gems
- Scrolls – Used in combining gems
NOTE: Don’t confuse gems with diamonds. For a long time, the community has used those two words interchangeably. Diamonds are the game’s currency. They can be used to purchase just about anything that you want in the game. Gems are a new feature, just introduced.
Fighting in Gem Bay
Every day you can enter Gem Bay once for free. After your free journey has been used up, you will need to spend food to go on additional journeys.
I strongly recommend that you take full advantage of this allowance. The only potential drawback to entering the bay for free is that you could end up expending spells.

When you enter Gem Bay, you are prompted to select up to 12 fighters to bring with you on your journey, and up to 9 spells.
NOTE: If you have a Premium account, then you will get 2 free journeys per day, rather than one. You also can bring up to 12 spells on your journey with Premium, rather than the standard 9 spells.
Fighters
There is no disadvantage to bringing a full complement of 12 fighters on your journey with you. You will only use 6 at a time, and so the more options you have available to build this team of 6, the better you will perform.
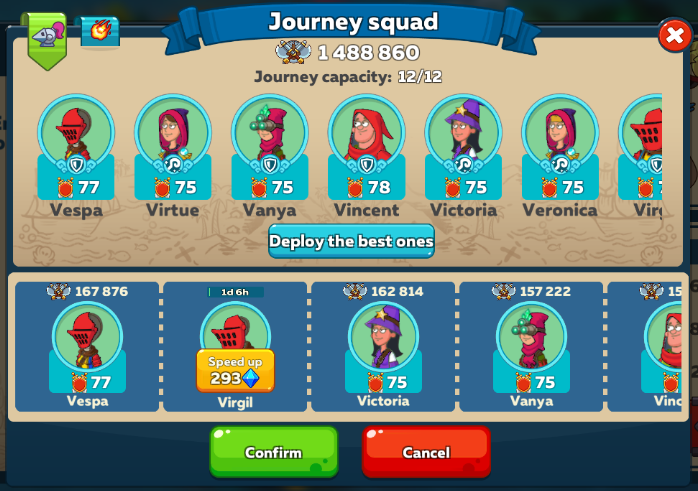
You can pull fighters from any part of the castle. There is a handy “Deploy the best ones” button that you can click to select the 12 best fighters. The game seems to select the best based on the dweller’s fighting power. This is usually a good idea, and can save you some time, but be aware that it selects dwellers based on their current equipment, and so it might not necessarily select the highest-leveled fighters.
You will need to equip your fighters as desired before you click the Confirm button. Once you confirm your journey squad, you will not be able to adjust their equipment.
Spells
The introduction of Gem Bay makes spells much more important. Previously they were only useful in PvP, PvE, and Portal. But now you can bring up to 12 spells with you on your journey. These spells can be selected from both your Combat Spells (equipped) and from your Prepared Spells (inventory).
Any spells that you don’t use will be returned to you once your journey is over.
Mercenaries
You can hire mercenaries during your journey to augment your squad. These mercenaries are very powerful fighters, but they are also expensive. There are 5 pairs of mercenaries, 2 tanks and 3 mages. The two fighters within each pair are similar to each other except that one is always stronger than the other. The weaker fighter always costs 99 diamonds to hire, and the stronger one always costs 199 diamonds.
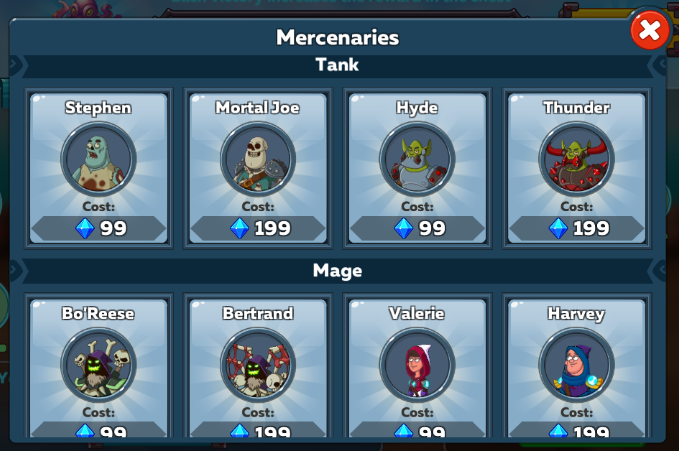
Tank
- Stephen & Mortal Joe – lower damage per second, higher health
- Hyde & Thunder – higher damage per second, lower health
Mage
- Bo’Reese & Bertrand – Focus on strong attack with occasional small healing of allies.
- Valerie & Harvey – Focus on healing allies. Harvey has significantly higher health than Bertrand, but lower Crit.
- Mr. Sins & Heartless One – Focus on resurrection, with occasional stasis field to protect self. Heartless One also heals allies occasionally, and has significantly higher health than Bertrand and Harvey, but lower Crit and Dodge.
Gem Bay spells
There are also 3 special spells that can be purchased in Gem Bay. They are similar to Portal spells in that they are unique to Gem Bay, and they can only be used in that setting.
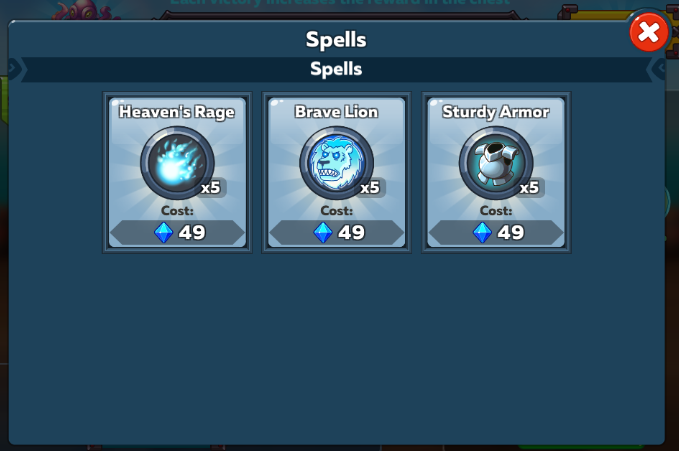
These spells cost 49 diamonds for a 5 pack, and they augment your own crafted spells in the following ways:
- Unlike your crafted spells, you can take as many Gem Bay spells as you want into each battle.
- You can still carry 6 crafted spells into each battle, in addition to whatever number of Gem Bay spells you equip.
- The Gem Bay spells have a separate cool-down cycle from your crafted spells, which means you can cast spells more rapidly when you utilize both types.
Here are the spells available for purchase in Gem Bay:
- Heaven’s Rage – Deals 12000 damage to all enemies hit by the explosion
- Brave Lion – Increases ally damage by 175% for 4 seconds
- Sturdy Armor – Increases ally physical armor by 35% for 7 seconds
Gem Bay battles
During your Gem Bay journey, you fight a sequence of 15 battles of (generally) increasing difficulty. Each battle is against another player’s squad, but unlike in the Arena, the battles do not require your opponent to be interactively playing the game.
TIP: You can even exit Gem Bay during your journey by clicking the red X in the top-right corner. If you do so, then you can come back at any time later to continue where you left off.
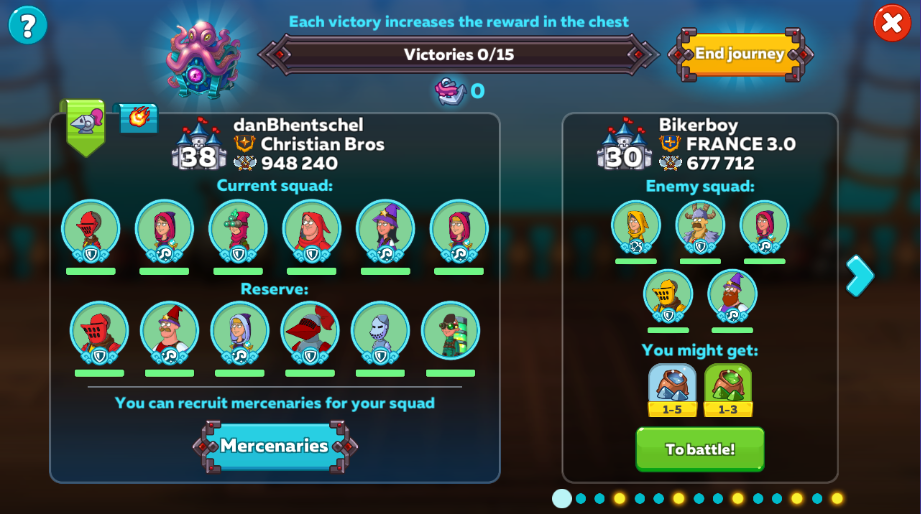
Notice in the image above that the battles are shown by a sequence of blue and yellow dots. The color of the dots indicates the rewards that you can get from winning the battle. Battles on a blue dot will only provide Dust rewards. Yellow dot battles will provide Dust, Gems, and Scrolls.
NOTE: The rewards shown for each battle are just potential rewards. They are not guaranteed. Winning the battle doesn’t guarantee that you will get everything shown.
For each battle, you can select up to 6 fighters (out of the 12 brought into Gem Bay) to form your squad. You can also select up to 6 spells. You will be given the opportunity to both hire Mercenaries and buy Spells in between each battle.
If any of your fighters is dead at the conclusion of a battle, regardless of win or loss, then that fighter can’t be used again in any subsequent battles. Whatever health your fighters have left at the end of a successful battle will be carried over to the start of the next battle.
On the other hand, if you lose a battle, then your opponent’s fighters will start the next battle with whatever health they had left at the end of the previous one.
Squad building tips
- You might want to use your weaker fighters early on in the easier battles so that your stronger fighters are fresh when things get tough.
- Make sure your squad is strong enough. If you get wiped out on one of the early levels, then you will lose 6 of your 12 fighters. This can seriously limit how far your journey will go.
- Beware of relying on resurrect mages. If you win a battle while one of your fighters is dead, then you will lose that fighter for the rest of the journey. It can be a bit random and frustrating.
- Have plenty of strong tanks available in reserve. They tend to be the most likely to be dead at the end of a battle.
- Don’t pad your squad with weak dwellers such as cooks or treasurers. They will die quickly, and your mages will waste precious resurrect and heal spells on them.
Ending your journey
You can end your journey at any time, although I usually will fight until every dweller has been eliminated. It doesn’t hurt to try!
When you decide to end your journey, you will be presented with your potential winnings. Remember that you are not guaranteed anything that you see. It’s just potential at this point. For example, look at this haul from one of my journeys:

Wow! Up to 2 gray Gems, a green Gem, a common Scroll, and an uncommon Scroll! Sounds good, right? Let’s see what I actually got:
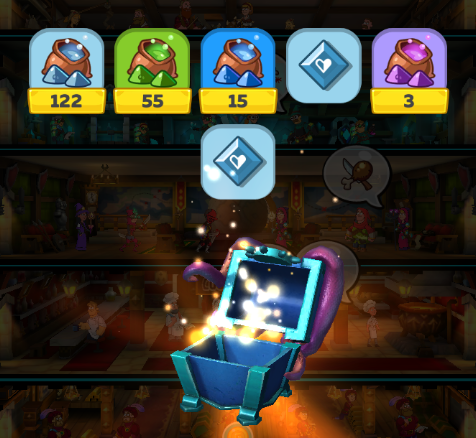
What happened to the green Gem and the Scrolls? They never manifested.
The Gem Workshop
The Gem Workshop is where you will do all your Gem-related operations. You will need to build the room, but it doesn’t require much in the way of resources, and it builds very quickly. You won’t ever need to upgrade it.
Effects on the gameplay
The Gem Workshop changes overall gameplay in the following ways:
- Gold is much more important because every operation requires Gold; sometimes lots of it. Be prepared to do PvP battles to fund your Gem work.
- It provides another use for Shards. You can recycle them into Dust. Even orange Shards can be used for this! No more holding on to your legendary equipment forever…
- It’s another place for your scientists to work. Recycling Shards into Dust takes time, and can be sped up by adding scientists to the room.
- It somewhat requires you to spend small amounts of diamonds. The only way to remove a Shard from a piece of equipment is to spend diamonds.
Inlaying Gems
The process of placing a Gem into a piece of equipment is called Inlaying. Each piece of rare, epic, or legendary equipment of a sufficiently high level (above level 55 or so) has Sockets in them, according to the following tables:
Number of sockets
| Rarity | Number of sockets |
|---|---|
| Common | 0 |
| Uncommon | 0 |
| Rare | 1 |
| Epic | 2 - 3 |
| Legendary | 4 - 5 |
Types of sockets
| Equipment type | Health | Damage | Magic damage | Armor | Magic armor | Spell power | Dodge | Crit |
|---|---|---|---|---|---|---|---|---|
| Melee weapons | X | X | X | |||||
| Magic weapons | X | X | X | X | ||||
| Tank armor | X | X | X | X | X | X | ||
| Archer armor | X | X | X | X | ||||
| Mage armor | X | X | X | X | X | |||
| Ring | X | X | X | X | ||||
| Amulet | X | X | X | X |
Gems can be inlaid into a socket if the type of Gem (Health, Armor, Crit, etc.) matches the type of socket.
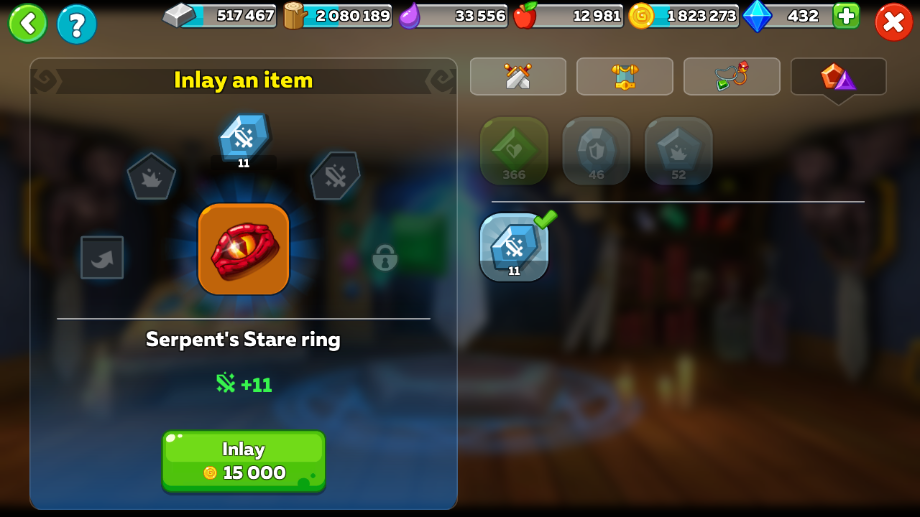
After the Gem has been inlaid into a socket, it will enhance the associated stat of that piece of equipment. For example, a Crit Gem will add to the Crit value of the item.
You can see the effect of the enhancement when looking at your fighter’s equipment:
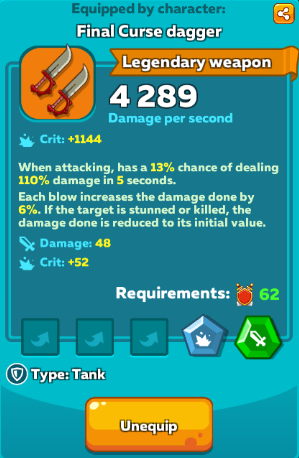
These daggers have a gray Crit Gem and a green Damage Gem. You can see the benefit of each at the bottom of the description: 48 Damage and 52 Crit.
Extracting Gems
Once a Gem has been inlaid into a piece of equipment, it can only be removed by extracting it. The extraction process costs diamonds according to the following table:
Cost to extract a gem
| Gem color | Number of diamonds |
|---|---|
| Gray | 1 |
| Green | 5 |
| Blue | 10 |
| Purple | ?? |
| Orange | ?? |
You extract a Gem by “Using” a piece of equipment on the Inlay screen. You then click the Gem that you want to extract, and select Extract from the menu.
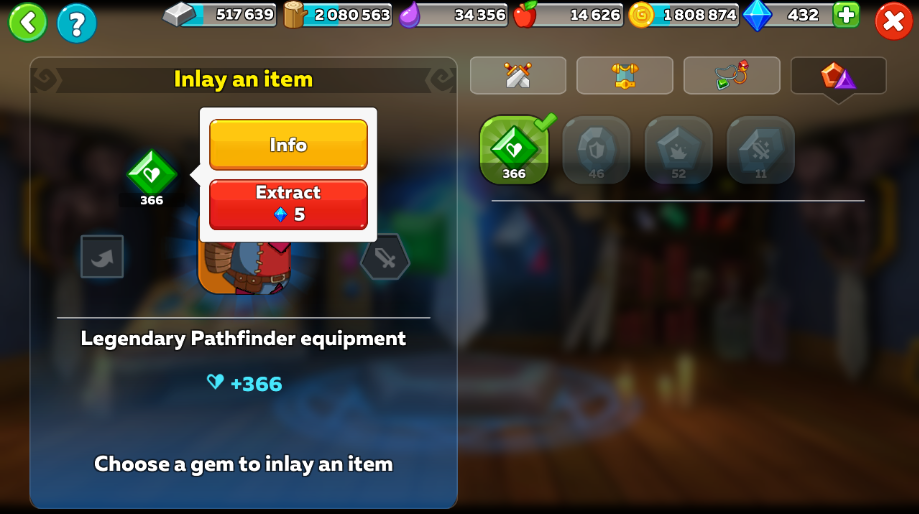
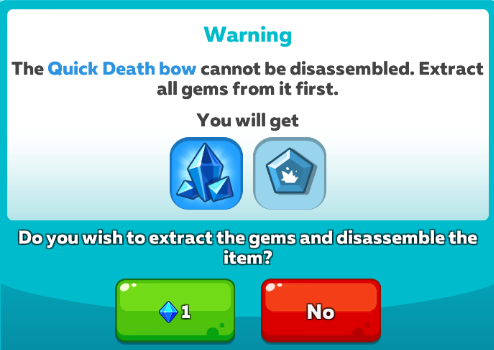
NOTE: You can’t break apart a piece of equipment until you extract all the Gems from it. If you try to break apart something that has an inlaid Gem, then you will be prompted to extract the Gem first.
Enhancing Gems
Gems have levels. The higher the Gem’s level, the more powerful it is. Gems increase in level by enhancing them with XP. The number of levels, and the amount of XP required to level up depends on the color of the Gem:
Levels and XP required for each Gem color
| Gem color | Number of levels | XP required to level up |
|---|---|---|
| Gray | 5 | 375 |
| Green | 10 | 3000 |
| Blue | 20 | 7500 |
| Purple | ?? | ?? |
| Orange | ?? | ?? |
So, for example, to enhance a green Gem from level 1 to level 3, you would need to apply 6000 XP, since each level requires 3000 XP. The XP to level up Gems comes from Dust. The different Dust colors provide different amounts of XP, according to this table:
XP for each dust color
| Dust color | XP per unit of dust |
|---|---|
| Gray | 1 |
| Green | 6 |
| Blue | 70 |
| Purple | 550 |
| Orange | 4200 |
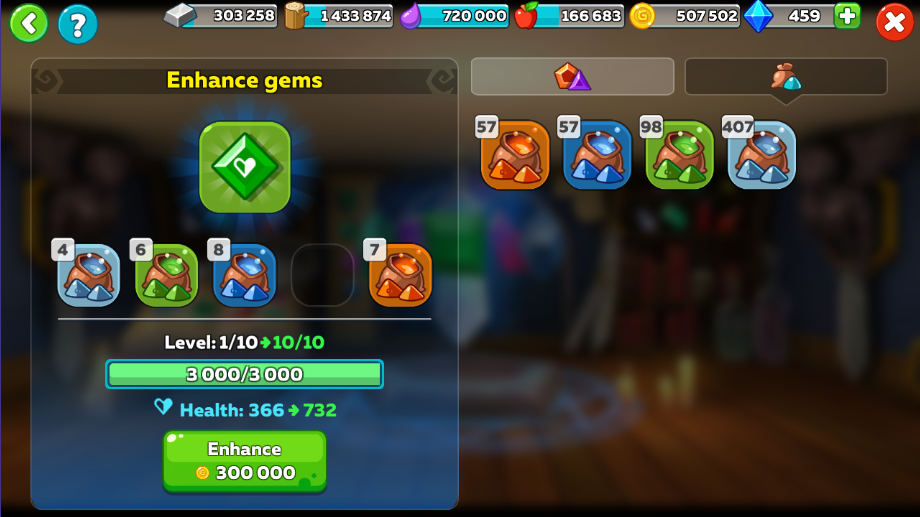
Notice in the above picture that the gem is being enhanced 10 levels. This costs 30000 XP. If you add up all the dust values from the image, you get 7 x 42000 + 8 x 70 + 6 x 6 + 4 = 30000. So this operation is calculated out perfectly to spend exactly the correct amount of XP.
Enhancement tips
- The game will let you overspend XP. For example, the green Gem above could have been leveled up by spending 8 orange dust. That’s 33600 XP. Try to keep a supply of dust of different colors so that you can use the correct amounts to get exactly the right XP.
- A gem’s level is not maxed out until you fill up its XP bar again after it reaches the highest level. So, for example, a gray gem will go to level 2 if you spend 375 XP. It will go to level 3 if you spend 750 XP, level 4 for 1125, and level 5 for 1500 XP. However, you will need to spend an additional 375 XP (for a total of 1875) in order to max out the Gem. It won’t push you to level 6, and you won’t get any additional benefit from the Gem, but it is required before you can use the Gem in a merge.
- You do not need to spend XP all at once. You can enhance a Gem a level or two by spending some XP on it, then use the Gem for a while, then later go spend more XP on the Gem to enhance it some more.
- You can enhance a Gem that is already inlaid into the socket of a piece of equipment. It’s not necessary to extract the Gem first.
Merging Gems
You can create Gems of more powerful colors by merging two Gems together.
In order to merge two Gems, the following must be true:
- Both Gems must be the same color. For example, you can merge a gray with gray, but you cannot merge a gray with green.
- Both Gems must be the same type. For example, you can merge a Health with Health, but you cannot merge a Health with Crit.
- Both Gems must be maxed out on XP. They must be at the highest possible level for that color of Gem, and the XP bar must be full.
- At least one of the Gems must not be inlaid in a piece of equipment. It’s okay for only one Gem to be inlaid.
TIP: If you merge an inlaid Gem with a non-inlaid Gem, then the resulting Gem will be inlaid in that piece of equipment.
Merging two Gems together to form a new Gem can possibly fail. The more powerful the color of Gem you are creating, the more likely it is that the procedure will fail. The following table shows the likelihood that a merge operation will succeed:
Costs and success rates associated with merging Gems
| Gem color being created | Merge cost (gold) | Likelihood of success |
|---|---|---|
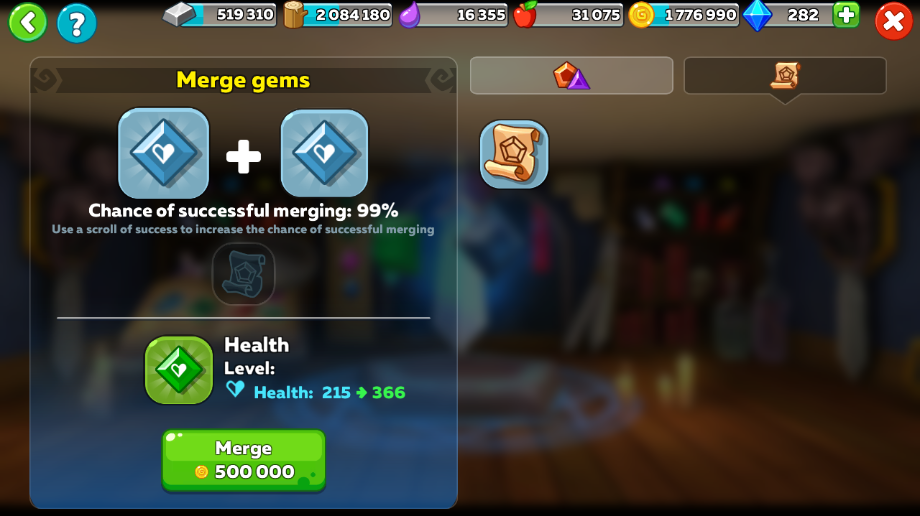
| Green | 500000 | 99% |
| Blue | 1500000 | 70% |
| Purple | 2500000 | 50% |
| Orange | ?? | ?? |
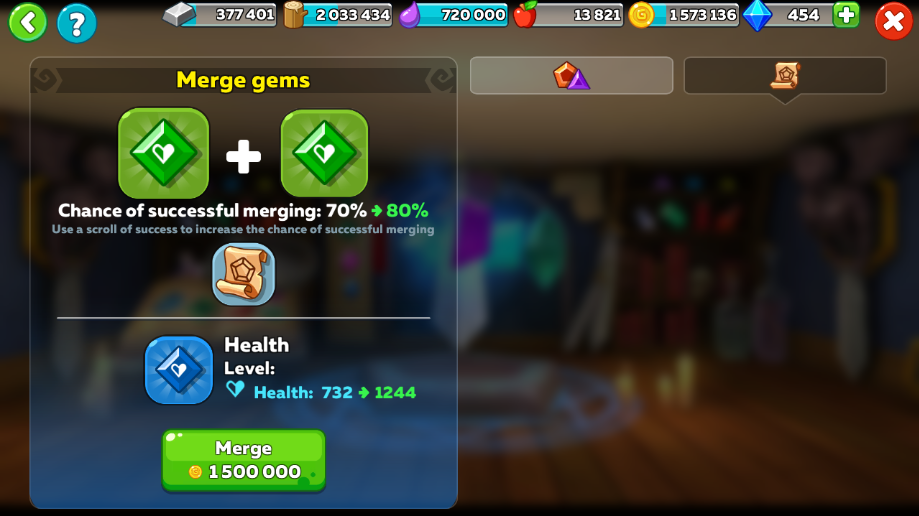
You can use a Scroll to increase the likelihood of a successful merge. In the image above, you can see a common Scroll being applied to the merge operation to increase the likelihood of success from 70% to 80%. Only a single scroll can be applied, and after the merge is done, the scroll is used up, regardless of whether or not the merge was a success.
If the merge is successful, you will have a single Gem of a different color, and it will be on level 1, with no XP. If the merge fails, then you are left with the original 2 Gems. Both of them will lose some random amount of XP, and may lose several levels. They will need to be leveled up to the maximum again before the merge can be reattempted.
Recycling Shards
You can recycle Shards to turn them into Dust. This procedure is relatively straight-forward. You just pick the Shards that you want to recycle, and then start the operation.
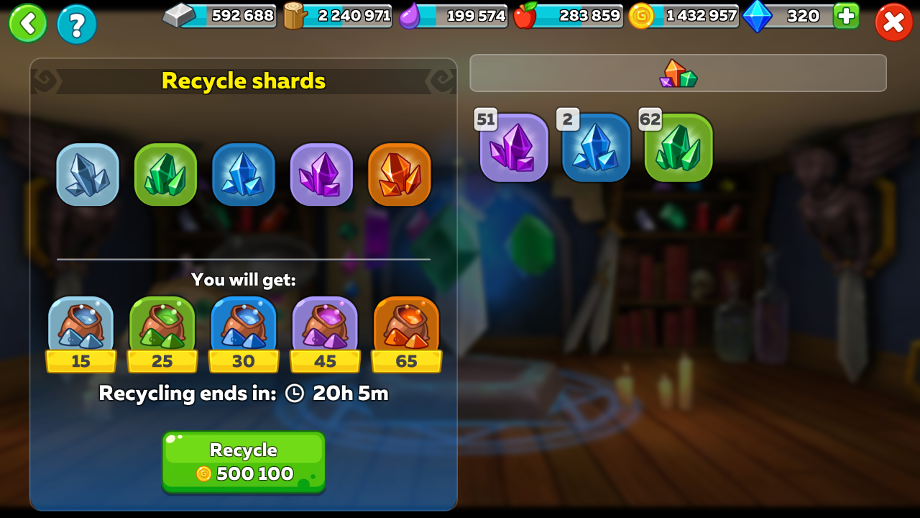
As can be seen above, you can select shards of different colors and process them all at the same time. The more shards you choose, the more Gold you will need to spend, and the longer the process will take.
Not all Shards produce the same amount of Dust. This table shows how much Dust, and consequently how much XP, each Shard color produces:
Quantities of Dust and XP from different Shard colors
| Shard color | Amount of dust | Amount of XP |
|---|---|---|
| Gray | 15 | 15 |
| Green | 25 | 90 |
| Blue | 30 | 2100 |
| Purple | 45 | 24750 |
| Orange | 65 | 273000 |
Also, the different Shard colors take different amounts of time to recycle. The rarer the Shard, the longer it takes. If you recycle multiple Shards of the same color, the amount of time per Shard decreases. So, for example, to recycle a single green Shard takes 30 minutes, but to recycle 33 green shards doesn’t take 16.5 hours. It only takes 13.5 hours. This table shows the amount of time to recycle a single Shard of each color:
Time to recycle a Shard
| Shard color | Time to recycle one shard |
|---|---|
| Gray | 5 min |
| Green | 30 min |
| Blue | 1 hr 30 min |
| Purple | 6 hr |
| Orange | 12 hr |
TIP: Notice in the image above that it takes 20 hr 5 min to recycle one of each shard. If you add the numbers for a single shard of each color together, you’ll see that it adds up to 20 hr 5 min. There is no time savings for recycling shards of different colors at the same time.